
In a scene, the inputs are stacked/layered on top of each other. For each layer (input), you can set several properties that control the position, scaling, opacity, blend mode, audio active, layer active, etc.
To add, delete, and rearrange layers, see User interface/Scene layers (6).
For the selected layer, the Preview window will display a yellow outline representing that layer. For the other layers, the preview window will display a slightly dimmed outline.
In the preview window, the selected layer can be moved and scaled using the outline handles.
To select a scene, click on the scene name just above the scene layers.
Scene Layer Options
For each layer, the following functions/properties are available:
- Eye icon: Enable or disable the video of the layer. When disabled, the layer’s properties are dimmed to indicate inactivity.
- Speaker icon: Enable or disable audio of the layer.
- Audio Level: Displays an audio level indicator that shows the peak levels of the left and right channels. The indicator turns red when the level exceeds 100% (0 dB).
- Lock icon: Lock/unlock layer moving and scaling in the preview window. The locked layer can still be edited using layer properties.
- Layer/alpha icon: There are four different settings related to how an alpha channel operates in a layer:
- Default (not checked) - The alpha channel (if it exists in the layer) is used as a mask for the layer itself.
- Layer icon - The alpha channel of the layer is used as a mask for the layer below. The RGB content of the layer is ignored.
- Layer icon (+) - The alpha channel is added to the layer’s alpha channel below. This is often called additive alpha. The RGB content of the layer is ignored.
- Layer icon (-) - The alpha channel is subtracted from the layer’s alpha channel below. This is often called subtractive alpha. The RGB content of the layer is ignored.
- More on masking and alpha channels in a separate chapter.
- Operator icon: The icon indicates if there are one or more Operator added to the scene layer. By clicking on the icon the Operator tab will open.
- Layer name: name of the input or scene
- Blend mode: type of blending mode used when rendering the layer. More information can be found here.
- Processing time: if detailed processing time is enabled (in Settings), this will display the GPU Kernel Execution time of the layer (ms).
- Anchor X/Y: center coordinate used in rotation transformation
- Position X/Y: X/Y position in the scene. The upper left corner is 0,0. Right-click to access the context menu for "Reset Position X,Y." The selected layer's position can also be changed using the left, right, up, and down arrow keys.
- Scale X/Y: Scale in X/Y in %. Right-click to access the context menu for "Reset Scale X,Y" and "Scale to fit". The "Scale to fit" will scale to fit the Scene's width and height. The scaling will be proportional by enabling the icon between Scale X and Scale Y.
- Rotation: rotation in angles. Rotation is centered around the anchor position (above).
- Opacity: layer transparency. The opacity will operate on the whole layer if there is no alpha channel in the layer. If an alpha channel exists, the opacity setting will operate as a pre-multiplier.
- Batch: See documentation further down on this page.
Items in the list are rendered top-to-bottom, meaning that the items at the bottom of the list will be rendered on top of the ones above.
Use the yellow arrows to collapse/expand the scene layers view.
Composite Layers
A Composite Layer is a special layer type that flattens all layers below it into a single image. This flattened image can then have operators (effects) applied to it, allowing you to process multiple layers as if they were one.
Without a Composite Layer, operators can only be applied to individual layers. With a Composite Layer, you can apply effects like blur, color correction, or glow to the combined result of multiple layers at once.
.png) →
→ .png)
See Composite Layers for more information.
Batches
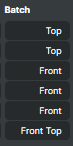
Batches make it easy to control multiple layers as a group — for example, to show or hide all overlays tagged “Front” with a single action.
Each scene layer includes a Batch property where you can enter one or more batch names (space-separated).
Layers sharing the same batch name respond together to API or Script Engine commands targeting that name.
Batches in Composer provide a convenient way to group and control multiple scene layers simultaneously.
Each Scene Layer can be assigned one or more batch labels (separated by spaces) in its Batch field. These labels act as identifiers that can later be used by the Batch Input or the Batch API to show, hide, or solo all layers that share the same label — in one operation.
This is particularly useful for managing complex scenes with many layers, for example:
- Quickly switching between camera angles (e.g., FrontCam, BackCam, WideShot)
- Toggling groups of overlays or graphics
- Controlling visibility of specific scene groups via automation or scripting
Format for Batch API-Requests
http://[YOUR_IP:PORT]/api/batch/[ACTION_TYPE]?batch=[BATCH_NAME]&scene=[SCENE_NAME]&comparison=[COMPARISON_TYPE]Parameters:
- YOUR_IP – The IP address of the system running Composer, e.g., 127.0.0.1
- PORT – The Composer API port. Default is 44433. This can be changed in Settings.
- ACTION_TYPE – What you want to do with the matching layers:
- showlayersolo – Show only the matching layers and hide all others.
- showlayer – Show the layers.
- hidelayer – Hide the layers.
- BATCH_NAME – The batch name (or names) to target.
- SCENE_NAME (optional) – Restrict the command to a specific scene. Leave out to include all scenes.
- COMPARISON_TYPE(optional) – How to compare the batch name with the layer’s batch field:
- contains (default)
- equal
- startswith
- endswith
Examples
1. Show all layers labeled “FrontCam”
http://127.0.0.1:44433/api/batch/showlayer?batch=FrontCam2. Show only layers labeled “Scoreboard” in a specific scene, hiding all others
http://127.0.0.1:44433/api/batch/showlayersolo?batch=Scoreboard&scene=GameScene3. Hide all layers with a batch name ending with “Logo”
http://127.0.0.1:44433/api/batch/hidelayer?batch=Logo&comparison=endswithBatches can also be controlled directly inside Composer — not only through API commands. You can trigger the same show, hide, or solo actions visually or programmatically using the: