The Connectors feature is one of Composer’s most powerful tools. It allows you to create custom sequences of actions based on Commands that can be triggered from external systems through Composer’s built-in HTTP API.
This means that other systems—such as a game server, community platform, or backend service—can control what happens inside Composer.
What Makes Connectors Powerful?
Connectors can change or animate any property and trigger commands such as play, stop, or connect on any object within Composer.
This includes inputs, scenes, layers, operators, and targets — essentially anything you can control manually in Composer can also be controlled by a Connector.
Example Use Cases:
- Change the active scene or switch cameras
- Start or stop an animation or media clip
- Show or hide visual layers
- Change audio sources or trigger sound effects
- And much more
Difference Between the Regular API and Connectors
A regular API call performs a single, predefined Composer function—such as retrieving information or starting playback. A Connector, on the other hand, executes a custom sequence of actions that you define, in the order and with the behavior you specify.
Each Connector can contain one or more API Commands, where each command performs a specific action (for example, setting a property or triggering an event). When a Connector is triggered, all its API Commands are executed (unless disabled).
You can also configure how Composer handles multiple Connector triggers—for example, whether it should show a warning or prevent a new Connector from running while another is active. These options are available under Settings and Web API.
Activate Web API
Before using Connectors externally, make sure Composer is configured to receive API requests.
- From the main menu, select
Edit->Settings->Web API - Enable the option “Enable Web API”
- Select a port number; the default is 44433
Once enabled, Composer will start listening for incoming HTTP requests from other systems.
For more configuration details, see Settings.
Calling a Connector (quick overview)
Calling an external application is easy. There are two simple ways to call a Connector — by its Name or by its Value.
- By Name
http://YOURIP:PORT/api/connector/trigger?name=MyConnectorName - By Value
http://YOURIP:PORT/api/connector/trigger?value=MyConnectorValue
Managing Connectors
You can add, organize, or remove Connectors directly from the Connectors tab.
- Add a new Connector: Click
Add Connectorto create a new Connector entry. - Collapse all Connectors: Click the collapse button next to the Connector name to quickly minimize the selected Connector.
- Delete a Connector: Select the Connector and press the
Deletekey, or right-click and chooseDeletefrom the context menu. - Clone a Connector: Right-click on a Connector and select
Clonefrom the context menu to create an exact copy, including all its API Commands and settings. - Reorder Connectors: Drag and drop Connectors to change their order in the list.
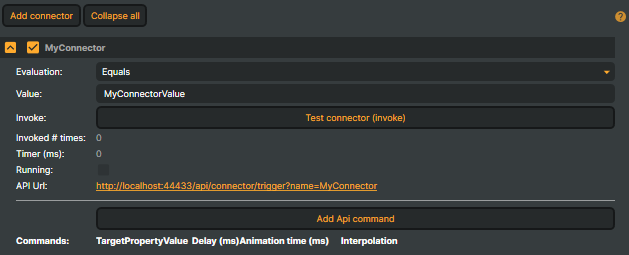
Connector Options
Each Connector includes several key properties that define how it behaves and how it can be triggered.
- Name - The name of the Connector (e.g.,
MyConnectorName). Double-click the name field to rename the Connector. - Evaluation - Defines how the Connector’s Value is compared when triggered. Options are:
- Contains
- ContainsNot
- Equals (default)
- EqualsNot
- Value - The key value used to trigger this Connector when calling it by Value via the API.
- Invoke - Click the
Test Connector (Invoke)button to manually trigger all API commands assigned to the Connector. Useful for testing and verifying behavior directly from within Composer. - Invoked # times - Displays how many times the Connector has been triggered.
- Timer (ms) - Shows the total execution time, in milliseconds, for the Connector to complete all assigned commands.
- Running - Indicates whether the Connector is currently active (i.e., executing commands).
- API Url - The API endpoint used to execute this Connector. Clicking the URL will open the default Web browser and invoke the Connector.
- Add API Command - Click
Add API Commandto create a new command for this Connector.
See the section API Commands for more details.
Adding Commands (actions) to a Connector

- To add a Command - Click the
Add API Commandbutton to open the API Command window (see section below). - To remove a Command - Right-click an existing command and select
Remove API Command. - To duplicate a Command - Right-click an existing command and select
Duplicate APICommand. - To reorder Commands - Drag and drop commands to change their execution order.💡 Tip:Hold down the
ALTkey while dragging a command to copy it to another connector instead of moving it.
API Command Window - Selecting a Target Component
When adding a new API Command to a Connector, the API Command Window helps you quickly locate and select the correct component from your project.
This window provides powerful tools for browsing large or complex projects, making it easy to find exactly what you want to control.
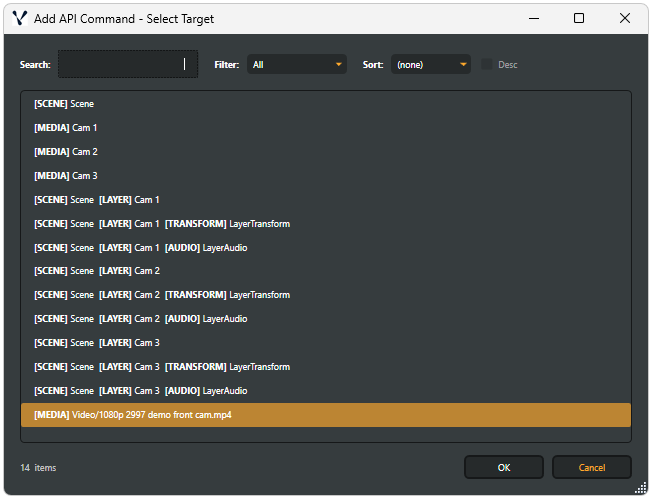
Search
- The Search field allows you to find components by name.
- It works across all component types, including:
- Inputs
- Targets
- Operators
- Scenes
- The search is case-insensitive and updates the result list as you type.
This is the fastest way to locate a specific component if you already know its name.
Filter
The Filter option limits which types of components are shown in the list.
Available filter options:
- All – Shows every component in the project (default)
- Inputs
- Layers
- Transform
- Audio
- Operators
- Targets
- Scenes
Use filters to reduce visual clutter and focus only on relevant component types.
Sort
The Sort option controls how the displayed components are ordered.
Available sorting options:
- None – Uses the default project order
- Name – Sorts components alphabetically
- Type – Groups components by their type
Sorting is especially useful in projects with many similarly named components.
Confirming Selection
- Select the desired component from the list.
- Click OK to confirm the selection.
- The selected component is added as a new API Command in the Connector.
From there, you can configure the Command’s Property, Value, Delay, Animation Time, and other options.
Command Options
A Connector is made up of one or more API Commands, where each command defines a specific action — such as setting a property value or executing a function.
When a Connector is started (also referred to as triggered or invoked), all enabled API Commands within it are executed in sequence.
Commands that are disabled are skipped.

Each API Command within a Connector defines a single action. These properties control how and when that action is executed.
- Commands - Toggles the Command on or off. Disabled commands are ignored when the Connector is triggered.
- Target - Specifies the object in Composer that the Command affects.
- Property - Defines which property of the target will be modified.
- Value - The new value to apply to the selected property.
- Delay - Sets the delay (in milliseconds) before the Command is executed.
- Animation Time - Some properties support animation. This property sets the animation duration in milliseconds.
- Interpolation - Determines how the animated transition progresses over time.
An empty connector containing no API commands does not affect Composer.
Context Menus
Composer provides context menus for both Connector Commands and Connectors to simplify workflow and improve efficiency when managing actions and logic.
- Connector Command Context Menu
- When right-clicking on an API Command (inside a Connector), the following options are available:
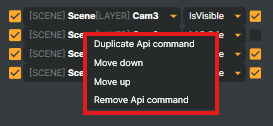
- Duplicate API Command
Creates an identical copy of the selected API Command within the same Connector.
This is useful when you want to create a new command based on an existing one—such as changing only the target, property, or value—without needing to configure all settings from scratch. - Move down
Moves the selected command down one step. - Move up
Moves the selected command up one step. - Remove API Command
Deletes the selected API Command from the Connector.
This allows you to remove actions that are no longer needed or were added by mistake.
- Duplicate API Command
- When right-clicking on an API Command (inside a Connector), the following options are available:
- Connector Context Menu
- When right-clicking on a Connector(in the Connectors list), the following options are available:
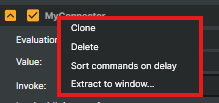
- Clone
Creates a complete duplicate of the selected Connector, including all its API Commands and settings.
This is useful when you have configured a complex Connector with multiple commands and want to create a similar Connector without rebuilding it manually. - Delete
Removes the selected Connector entirely from the project.
A confirmation prompt will appear to prevent accidental deletion. Sort Commands on Delay
Sorts all API Commands within the Connector in ascending order based on their Delay values.
This helps keep the command list organized and ensures the execution order visually matches the timing sequence.
Example before sorting: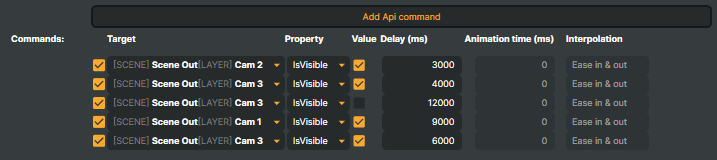 Example after sorting:
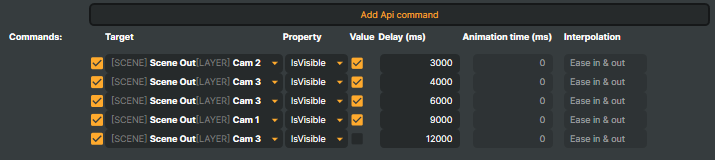
- Extract To Window
Moves the selected operator into its own separate, floating window outside the main Composer interface.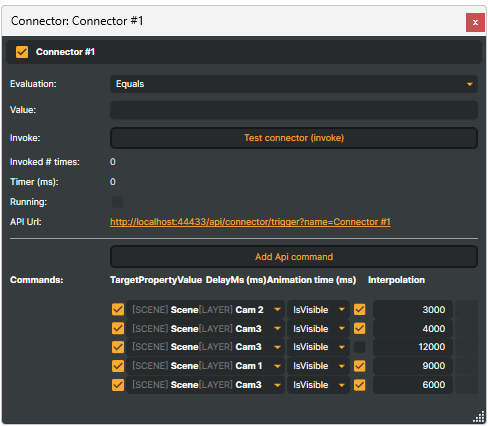 💡 Tip
💡 TipExtracting the window is useful when you want persistent access to an input’s settings or controls while working elsewhere in Composer, such as editing scenes, layers, operators, or targets. The extracted window remains visible and usable independently of the main UI, improving workflow efficiency on multi-monitor setups.
The input continues to function normally and remains part of the project — only its user interface is detached from the main window.
- Clone
- When right-clicking on a Connector(in the Connectors list), the following options are available:
Removing a Connector
There are two ways to remove a Connector:
- Click on the Connector you want to remove and press the
Deletebutton on your keyboard. - Right mouse-click and select
Deletefrom the context menu.
The following message will appear: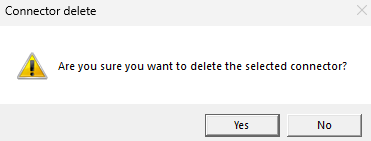
Click Yes to confirm.
Example Connector Setup
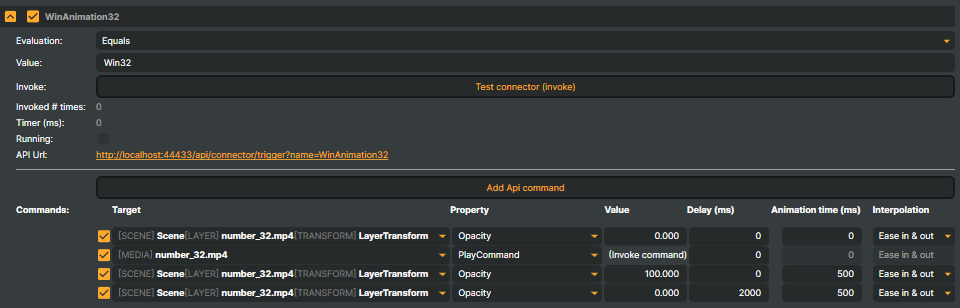
In the example above, using "Name", the connector will listen to API calls with the syntax name=WinAnimation32:
http://YOURIP:PORT/api/connector/trigger?name=WinAnimation32Using "Value", the connector will listen to API calls with the syntax value=win32 (with the evaluation set to "Equals"):
http://YOURIP:PORT/api/connector/trigger?value=win32When this Connector is triggered, the following four (4) commands will be executed:
- Set the opacity of the scene layer
number_32.mp4to 0.
(This ensures the layer is fully transparent before starting the animation sequence.) - Start playback of the media file
number_32.mp4. - Animate the opacity from
0to100over a duration of 500 ms, using the Ease In & Out interpolation method. - After a delay of 2000 ms, animate the opacity from
100back to0over 500 ms, again using Ease In & Out interpolation.
Parameterized Connectors:
Connectors can also use parameters, which are additional values passed through the API call to customize the Connector’s behavior.
Parameters are especially useful for actions that require dynamic data — for example, when sending cue points that include an eventId or other metadata.
These parameter values can be defined directly in the API call and then referenced within the Connector’s commands. This allows the same Connector to perform different actions depending on the parameter values provided.
Parameter Reference
To reference a parameter value inside an API Command, prefix the parameter name with @@.
For instance, using @@MyParameter Within a command, will insert the value provided for MyParameter in the API call.
Below are examples showing how to call a Connector by Name or Value, including a user-defined parameter (MyParameter):
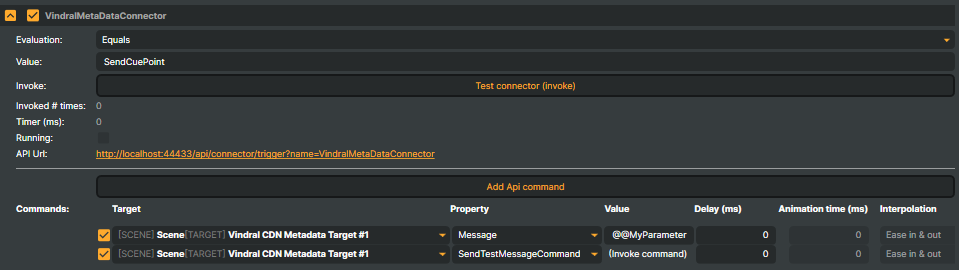
Example 1 - Calling a Connector by Name, including a user-defined parameter (MyParameter):
http://[YOURIP:PORT]/api/connector/trigger?name=VindralMetaDataConnector&MyParameter=32Example 2 - Calling a Connector by Value, also using the same user-defined parameter:
http://[YOURIP:PORT]/api/connector/trigger?value=SendCuePoint&MyParameter=32These examples pass the MyParameter value (32) as a message to the Vindral CDN Metadata Target, setting a cue point in the outgoing video stream.
See Vindral CDN Metadata Target for more details.
Calling multiple Connectors in a single API call:
You can trigger multiple Connectors at once using a single API call.
To do this, list the Connector Names separated by the + character (encoded as %2B in the URL).
Example:

http://[YOURIP:PORT]/api/connector/trigger?name=BigWinAnimation%2BWinAnimation32It’s also possible to trigger multiple Connectors based on their Value property by using the Evaluation options — Contains, ContainsNot, or EqualsNot.
When a Connector’s Value matches the evaluation condition, it will be triggered together with any other matching Connectors.
For example, the request below will trigger both Connectors with the values "BigWin" and "Win32", since both contain the substring "Win" and the Evaluation is set to Contains.
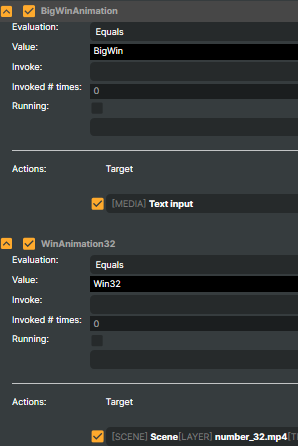 Example:
http://[YOURIP:PORT] /api/connector/trigger?value=WinExecute Batches using Connectors
Connectors can also trigger Batches, giving you powerful control over your scenes — instantly showing, hiding, or soloing entire groups of layers such as overlays, cameras, or graphics that share the same batch name.
To use this feature, add a Batch Processor Input to your project. The Batch Processor Input acts as a bridge between your Connectors and the Batch system, allowing Connectors to execute batch commands just like any other input or operator.
.png)
- Add a Batch Processor Input to your project
- Tag your Scene Layers with Batch Names
- Configure your Connector with Batch Processor commands
Using Script Engine with Connectors
Connectors can trigger custom JavaScript functions through Composer’s built-in Script Engine.
This makes it possible to execute dynamic logic—such as sending data, responding to state changes, or performing conditional actions—whenever a Connector is invoked.
For details on how to enable and get started with custom scripts, see Script Engine.
Function Naming Convention
When a Connector is triggered by Name, Composer automatically looks for a JavaScript function whose name is prefixed with OnConnector followed directly by the Connector’s name.
Example 1 :
If the Connector name is MyTestConnector, the corresponding function must be named OnConnectorMyTestConnector:
http://[YOURIP:PORT]/api/connector/trigger?name=MyTestConnectorfunction OnConnectorMyTestConnector()
{
// Write message to the Composer log
Logger.Debug("Hello World!");
}Passing Parameters to JavaScript
A Connector JavaScript function may optionally define one parameter.
If a parameter is defined, all query parameters from the API call will be passed to the function as a single argument.
Example 2 - Basic Query Parameters:
This argument is not automatically parsed — it’s up to the script to interpret or extract the parameter values.
http://[YOURIP:PORT]/api/connector/trigger?name=MyTestConnector&winner=Alex&score=92&round=3function OnConnectorMyTestConnector(parameters)
{
Logger.Debug("Connector triggered. Raw parameters: " + parameters);
// Remove leading '?' if present
if (parameters.startsWith("?"))
parameters = parameters.substring(1);
// Parse query string manually
var params = {};
var pairs = parameters.split("&");
for (var i = 0; i < pairs.length; i++) {
var parts = pairs[i].split("=");
var key = decodeURIComponent(parts[0]);
var value = decodeURIComponent(parts[1] || "");
params[key] = value;
}
// Access individual parameters
Logger.Debug("Winner: " + params.winner + " | Score: " + params.score + " | Round: " + params.round);
}Example 3 - JSON
Sometimes you may need to send more complex data (e.g., multiple related values) to a Connector in a single parameter.
You can achieve this by encoding a JSON object as a query string value, then decoding and parsing it inside your JavaScript function.
my_payload={"winner": "Alex", "score": 92, "round": 3}API request:
http://[YOURIP:PORT]/api/connector/trigger?name=MyTestConnector&my_payload={"winner": 20"Alex","score": 20"92","round": 203}Script:
function OnConnectorMyTestConnector(parameters)
{
    Logger.Debug("Connector triggered. Raw parameters: " + parameters);

    // Remove leading '?' if present
    if (parameters.startsWith("?"))
        parameters = parameters.substring(1);

    // Parse query string manually
    var params = {};
    var pairs = parameters.split("&");

    for (var i = 0; i < pairs.length; i++) {
        var parts = pairs[i].split("=");
        var key = decodeURIComponent(parts[0]);
        var value = decodeURIComponent(parts[1] || "");
        params[key] = value;
    }

    // Parse payload into a JSON-object
    const json = JSON.parse(params.my_payload);

    // Access individual parameters
    Logger.Debug("Winner: " + json .winner + " | Score: " + json .score + " | Round: " + json .round);
}