For the selected scene, the Scene view will display the output of the active scene. To enable the Scene view function. click the yellow Eye Icon found in the Scene view area. The preview feature is enabled by default and will automatically be disabled after user time-out. The reason for the feature being disabled after the time-out is that the Scene view feature itself consumes resources.
If the scene is empty, or if all items in the scene are stopped/blank, the scene view will display a black screen.
To pan the preview window, press and hold the mouse scroll wheel and use the mouse to pan. You can also use CTRL+Space to activate the pan function. To exit the pan mode, left-click with the mouse.
You can change the scale (zoom in/out) using the zoom input field or the mouse scroll wheel. To automatically select a zoom level that makes you content fit inside the size of the preview window, press CTRL+F ("fit") or press the "Fit to window" button.
CTRL+P will Play/Pause all media inputs.
Right-click on the Scene View to access the dropdown menu functions:
- Layer
- Align - Adjust the scene layer to match the scene's width and height. Alignment options include center, left, right, top, and bottom.
- Scale - "Fit" scales the content to match the scene resolution while maintaining proportions. "Reset" restores the original resolution."
- Anchor - Center the anchor point of the scene layer.
- Copy image to clipboard - Copy Image to Clipboard - Copies a screenshot of the scene view to the clipboard.
- Save As - Saves a screenshot of the scene view to the disk.
- Fit to Window - The scene view will scale to fit the window.
- Toggle fullscreen. - Press F11 to toggle fullscreen mode for the scene view.

Scene view tools
 | Adds a grid as background. Useful when working with alpha channels. |
 | Show layer and layer operator editing handles |
 | Region Of Interest, visibility on/off. Define the Region Of Interest by dragging the handles. (one example of usage is with the operator face detect.).png) |
 | Video preview window on/off |
 | Audio preview tool |
.png) | Opens the Audio Preview popup, where you can select the source for audio preview. Available options are:
|
| Zoom | Use the zoom input field or the mouse scroll wheel to change the zoom level. |
 | Adjusts the zoom level to make the content fit in the scene preview window. Keyboard shortcut CTRL + F |
| Auto size | Automatically scale/fit the scene view when switching scenes |
| Locked to: | Lock the Scene preview window to a specific scene. When locked, it is not possible to select an input preview in the input section. |
 | Color picker tool. When using the color picker, the nearby data is updated: |
| X,Y | Displays the cursor position in X and Y. |
Color picker data fields
At the top of the scene view, you will find the color picker tool and labels representing red, green, blue, alpha, hue, saturation, and value. To read the pixel value of content in the scene view, activate the color picker tool.

Composer displays colors in two variants: RGBA and HSV. Both variants, or color spaces, can represent the same color, but they express colors differently.
RGBA:
| 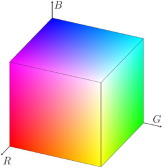 |
HSV:
| 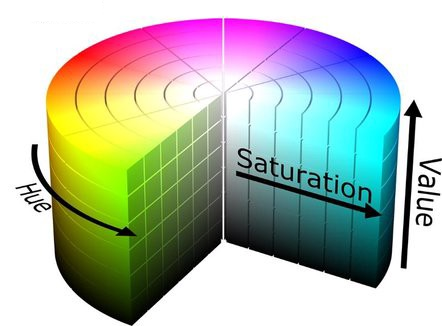 |
For more information on color spaces, visit https://en.wikibooks.org/wiki/Color_Models:_RGB,_HSV,_HSL.
Toggle layout

Toggles the Audio Mixer layout, where each input is shown with an audio strip and additional controls for detailed audio management.
Interactive mode

It is possible to run Composer in 'Kiosk' mode. This can be useful when creating demos with interactive buttons or images that have 'Enable Interactive' enabled, in conjunction with the script engine, to trigger events. The 'Interactive Button' input only works if 'Interactive Mode' is enabled. By default, Interactive Mode is inactive.
When activating Interactive Mode:
- The right-click popup menu in the scene view will not be accessible (i.e., it will not be shown).
- Handles will be disabled.
- Any selected scene layer will be deselected.
- Objects cannot be moved in the scene view.
Saving snapshots
The active scene output can be saved as a snapshot using the keyboard shortcut ALT+P.
Images are stored in the Application Snapshots folder and are automatically named as [HOSTNAME]_[DATETIME].png