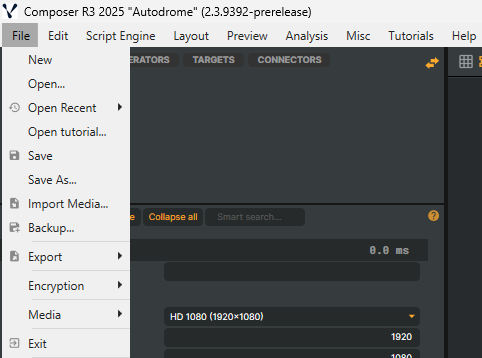
In the top-left corner of the application window, you can find the current version of the application and the application menu.

File

- New - Creates a new project consisting of an empty scene
- Open...
- Open Recent... - Contains a list of the latest 20 used projects.
- Open tutorial... - Opens the folder containing the downloaded tutorial projects. (See tutorials menu)
- Save
- Save As...
- Import Media... - Select one or several media to import as inputs (CAV video file, video file, or image file)
- Backup... - Backup of media assets used in the current project and the loaded .prj file to the folder specified in Settings.
(If a.cavfile is used in the project, the CAV file will be stopped before the backup is done, and then restarted once the backup is done. - Export
- Export project and all assets - Exports the project file,
.prjand all assets used in the project are moved to a selected folder. - Export Decklink capture snapshots - Exports snapshots from all Decklink capture cards to the designated
snapshotsfolder.
- Export project and all assets - Exports the project file,
- Encryption
- Import Encrypted project...
- Export Encrypted project As...
- Media
- Auto rename all scene layers... - Rename all scene layers to match their source input names.
- Auto rename inputs to short names... - Renames all inputs to their short filenames. This applies to inputs where the absolute filename is currently used as the name of the input.
- Consolidate - Copy all assets with an absolute URL to the Composer application Media folder.
- Reallocate missing media... - Check for missing files and provide the option to search for missing files from within a selected folder. The function uses the Assets Finder to enhance the file search function.
- Unload unused media - Remove unused media from the project.
- Exit - Exit application
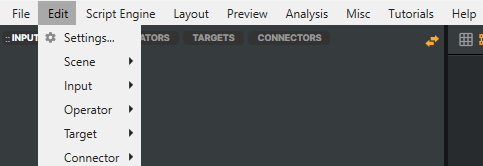
Edit

- Settings...
- Scene
- Add new - Create a new scene
- Duplicate - Duplicate the scene that is selected in the input library.
- Set as active - Set the selected scene as the active scene (if more than one scene is used).
- Input
- Add to scene - Add selected input to a new scene.
- Add to new scene - Add selected input to a new scene.
- Copy Image - Copy a full-size thumbnail to the clipboard of the selected input.
- Delete - Delete the selected input.
- Open location in Explorer... - Open up a Windows Explorer window where the selected input media file is located on the computer.
- Rename all scene layers - Rename all scene layers in all scenes using the selected input to the name of the input.
- Replace scene layer source - If a scene layer is active, selecting this option will change the source of the scene layer to the selected input.
- Operator
- Copy operator properties - Copy operator properties from the selected operator
- Paste operator properties - Paste operator properties to the selected operator. (The operator type must be the same as the typed copy)
- Duplicate - Duplicates the selected operator
- Delete - Delete the selected operator
- Target
- Delete - Delete the selected target.
- Connector
- Clone - Clones/duplicates the selected connector.
- Delete - Deletes the selected connector.
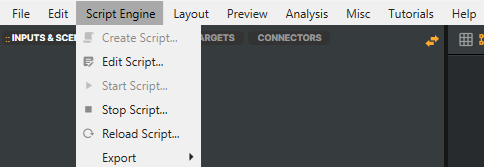
Script Engine

- Create Script... - Creates a new script based on an empty template. The project needs to be saved and reloaded before the script will be in use.
- Edit Script... - Opens the script in the default editor associated with the .js extension. If you have no editor for .js files, we recommend using Visual Studio Code.
- Start Script - Starts the script
- Stop Script - Stops the script
- Reload Script... - Reloads the script in the Script engine
- Export
- Export encrypted script... - This will encrypt the script and save the file in the same folder as the project file with the name [projectname].cxjs
For more information on the Script Engine, see Script Engine.
Layout

- Compositor - Switches to the default Composer layout.
- Audio Mixer - Switches to the Audio Mixer layout, where each input is shown with an audio strip and additional controls for detailed audio management.
Preview

- Video
- Toggle Video Preview On/Off - Turns the video preview on or off. When the
Dim scene preview area when disabledsetting is enabled (default), the scene preview will display the message “VIDEO PREVIEW OFF” to clearly indicate that the preview is disabled.
- Toggle Video Preview On/Off - Turns the video preview on or off. When the
- Audio
- Toggle Audio Preview On/Off - Turns the audio preview on or off.
- Source
- Active scene - Plays all audio inputs in the currently selected scene.
- Selected Input - Plays audio from the currently selected input only.
Analysis

- Open video analyzer window...
- Open log window...
- Reference data (activate
Show debug propertiesin Settings)- Save project reference image - This will create a snapshot image (PNG) and automatically save the image to the same folder as the project file. The image created will have the same filename as the project file, but with the suffix " - reference". Example: The project file "MyProject.prj" will render a reference image "MyProject - reference.png"
- Open project reference image - Opens the saved Project reference image in the application associated with the image file extension.
- Create performance report... - This will generate a performance report and copy the report to the clipboard. The report contains information about Composer version, license, system information, project performance, and the load rendered by the project. Performance reports can be helpful when tracking down issues, working on optimizations, or comparing system performance between different environments.
Misc

- System Information... - Opens up a window containing information on the Operating System, Application version, and GPU.
- Lock Application... - Locks the user interface and enables Performance Mode. In this mode, Composer hides all interface elements to minimize resource usage while you are idle or not actively working on a project. See the Performance Mode Page for more information.
- Export LUT Template... - Export a new/original LUT file that can be used for manipulation and then used in the LUT operator.
Tutorials

- Open tutorial... - Opens the folder containing the tutorial projects.
- Download tutorials - Opens a new window displaying the available tutorials to download. After downloading, select "Open tutorials" from the Tutorials menu.
Help
- Shortcuts, tips and tricks... - Opens up the online documentation website for Shortcuts, tips, and tricks.
- Online Documentation... - Opens up the online documentation website.
- Latest news - Show the latest news from Realsprint
- License Information... - Opens up a window containing license information
- Support... - Opens up the online support website