Media file input/CAV file input
CAV media is a proprietary media format designed for instant playback/seek. To convert a video file to the .cav media format the CAV Transcoder is used.
CAV Movie/Audio file input supports playback of video and audio clips, looping playback, and built-in cue points.
CAV is an abbreviation of "Composer Audio Video" and the file format has an advantage over traditional video formats as it supports instant seeking to any frame within the video clip.
CAV files also support built-in cue points, which makes it easier to play back selected sections of the video clip.
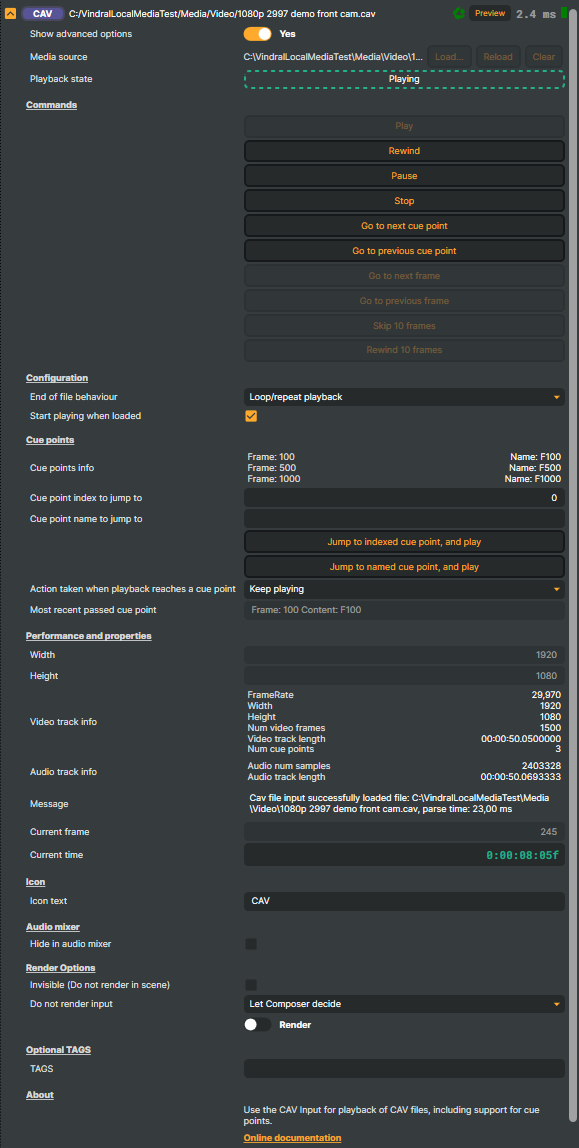
- Show advanced options - Toggles the display of advanced options.
- Media source - Use the Load button to load a clip into Composer. If a clip has been loaded, but the file has been modified, you can use the Reload button to refresh the clip in Composer. Use the Clear button to unload the clip.
Note! Only CAV files can be loaded - Playback state - Current playback state
- Commands:
- Play button (ALT+P toggles play/pause) - Start playback
- Rewind button - Rewind to start
- Pause button (ALT+P toggles play/pause) - Pause playback
- Stop button - Stop playback
- Go to next cue point - Advanced option. Jumps to the next cue point in the CAV file
- Go to previous cue point - Advanced option. Jumps to the previous cue point (not to the recently passed cue point)
- Go to next frame (ALT+RIGHT) - Step one frame forward (media needs to be paused)
- Go to the previous frame (ALT+LEFT) - Step one frame backward (media needs to be paused)
- Skip 10 frames (SHIFT+ALT+RIGHT) - Advanced option. Jumps ahead by 10 frames
- Rewind 10 frames (SHIFT+ALT+LEFT) - Advanced option. Jumps back by 10 frames
- Configuration:
- End-of-file behavior- Determines the action to perform at the end of the file. The options are:
- Loop/repeat playback
- Hold the last frame
- Stop.
- Start playing when loaded - Check this option to automatically start playback when the file is loaded (Default).
- End-of-file behavior- Determines the action to perform at the end of the file. The options are:
- Cue points: (toggle "Activate Show advanced options")
Use the CAV transcoder to insert cue points in the .cav media file. Jumping to a specific cue point in the media file via API is possible. Read about "Jump to Cue Point" in the WebAPI section. It is also possible to use Connectors when jumping to cue points. (In the connector, set the name of the cue point to jump to via the "JumpToCuePointName" property, then activate the jump by setting the property "JumpToNamedCuePointCommand").- Cue point info - Displays all cue points inserted in the video file
- Cue point index to jump to - Index cue point to jump to (0 = 1st cue point)
- Cue point name to jump to - Name of cue point to jump to.
- Jump to indexed cue point button - Media file will jump to cue point index specified in "Cue point index to jump to"
- Jump to named cue point button - Media file will jump to cue point name specified in "Cue point named to jump to"
- Action taken when passing a cue point- What action to perform when current time passes a cue point. The options are:
- Keep playing
- Pause playback
- Stop playback
- Rewind and play from the previous cue point
- Most recent passed cue point - Last cue point passed
- Icon
- Icon text- short descriptive text used in the input list. Limited to 5 characters.
- Audio mixer
- Hide in the audio mixer - if this option is set, the input will not appear in the audio mixer.
- Performance and properties:
- Video track info - Detailed debug information on video track properties
- Audio track info - Detailed debug information on audio track properties Performance Mode
- Message - Info message
- Current frame - Current playback frames
- Current time - Current playback time (Time code) in hours:minutes:seconds:frames.
- Render Options - These options, together with
Render Tuning(see Performance and Options), help optimize performance by letting Composer automatically decide whether the input should be rendered.
When your project’sRender Tuningoption is active, Composer manages each input’s rendering automatically for best performance.
These options allow you to override that behavior and manually decide if this input should be rendered or excluded from the scene.Render Tuning vs Render Options- Render Tuning works at the project level (see Performance and Options), automatically managing which inputs are rendered across all Scenes for optimal performance.
- Render Options work at the input level, letting you manually override or fine-tune how a specific input behaves within Composer’s automatic rendering process.
Beyond the settings covered above, the following resources provide additional guidance on optimizing Composer's performance on your system:Invisible (do not render in scene) - The input will not produce any visible output in the scene, regardless of whether Render Tuning is enabled at the project level.
- Do not render input
- Let Composer decide (default) - Composer automatically decides whether the input should be rendered, based on the active Scene and if Render Tuning is enabled.
- Manual configuration - Allows you to manually control rendering behavior using the Render switch (see below).
- Render - A toggle switch is available only when Manual configuration is selected.
- Optional TAGS
- TAGS - Add a "tag" that can be used in the input smart search function. It is possible to add several tags by separating them with a SPACE character.
- Resolution:
- Width - Video width (pixels)
- Height - Video height (pixels)
Audio Configuration and Processing Options
For inputs capable of processing audio, additional audio configuration and processing options are available through the Audio Mixer and the Channel Strip Inspector.
- Audio Mixer — Monitor levels, adjust gain and pan, mute/solo inputs, and configure auxiliary sends to Audio Channel Strips—all from a centralized mixer-style interface.
- Channel Strip Inspector— Access advanced audio processing options by selecting the input's mixer strip:
- Input trim, stereo remapping, and audio delay
- Channel mapping
- Gate
- Low cut filter
- Equalizer (5-band parametric EQ)
- Compressor
- Limiter
See Audio Mixer and the Channel Strip Inspector for more detailed information.