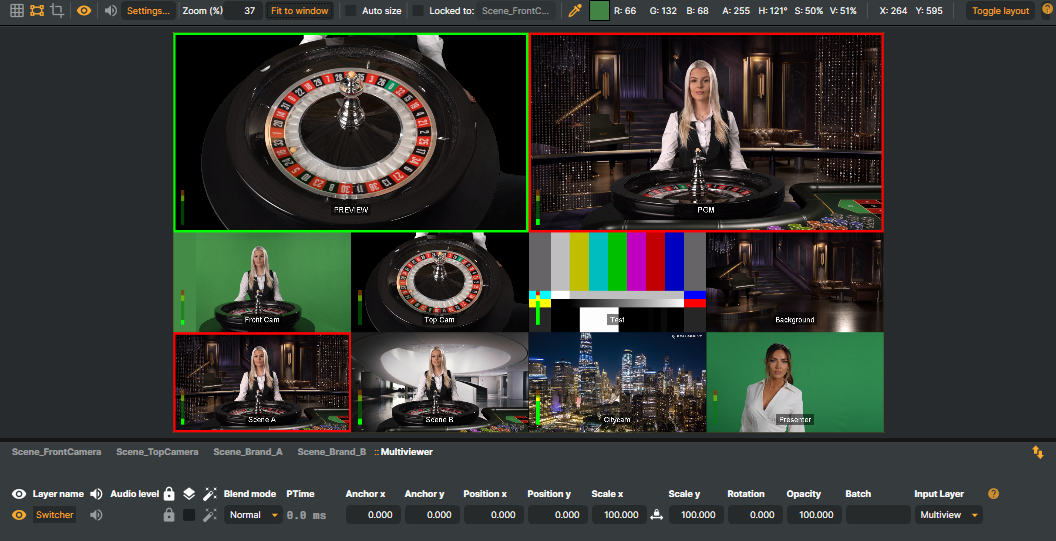
The Multiviewer is a powerful monitoring tool in Composer that displays multiple video sources on a single screen. It allows you to oversee live inputs and scenes, manage overlays, and track Program and Preview outputs in real time. Ideal for live productions, streaming, or complex scene management, the Multiviewer gives you full visibility and precise control over your workflow.
Requirement - Switcher Input
This documentation assumes that you have already set up and configured a Switcher Input with the Multiviewer enabled. For instructions on setup, see the Multiviewer Setup guide.
The Multiviewer can be controlled and utilized in three main ways:
Connectors – Integrate the Multiviewer with external systems or devices, such as control boards or broadcast automation tools, allowing remote control and seamless workflow integration.
Script Engine – Automate Multiviewer actions by writing scripts, enabling programmatic control over transitions, overlays, and input changes.
Manually – Directly interact with the Multiviewer in Composer to monitor sources, apply overlays, and manage transitions in real time.
Tip!
You can use the Companion app with its virtual Stream Deck—or a physical Stream Deck device—to trigger Multiviewer actions remotely. This works with API calls, Script Engine functions, or Connectors, giving you full flexibility to control inputs, overlays, and transitions from anywhere.
Connectors
The Multiviewer can be integrated with external systems or devices via Connectors. This allows remote control of inputs, overlays, and transitions, enabling automation and integration with control boards, broadcast automation tools, or custom workflows. For more details on configuring and using Connectors, see the Connectors documentation.
Example – Staging an Input in Preview
.png)
Create a new Connector, e.g.
PreviewConnector.From the Target dropdown, select your
SwitcherInput.Select
BackGroundInputNamefrom the Property dropdownUnder Value, define a custom Composer @@-parameter for setting the input name to be set in Preview, eg:
@@input
Once configured, you can place any of your inputs in the Multiviewer’s Preview slot remotely with an API call like:
// This API call will place the specified input into the Multiviewer’s Preview slot remotely, allowing you to cue content before going live.
http://[YOUR_IP]:[PORT]/api/connector/trigger?name=PreviewConnector&input=[NAME_OF_INPUT]
This example shows the basic usage of Connectors to get you started with controlling the Multiviewer. To learn more about creating and configuring Connectors and how they can be applied in different workflows, see the full Connectors documentation.
Script Engine
The Script Engine in Composer allows for advanced automation and customization of the Multiviewer. By writing JavaScript functions, you can programmatically control Multiviewer behaviors such as switching inputs, managing overlays, and triggering transitions. This is particularly useful for creating dynamic, event-driven workflows or integrating with external systems.
For more information, see the Script Engine documentation.
Example – Preview, PGM, Cut & Crossfade
// Reference the Switcher Input used by the Multiviewer
// Replace "MySwitcher" with the actual name of your Switcher Input in Composer
const switcher = Project.GetInputByName("MySwitcher");

// Place an input directly in the Multiviewer's PGM (Program) slot
// Use this to make an input go live immediately
function SetPGM(inputName) {
    switcher.ForegroundInputName = inputName;
    Logger.Info("PGM set to input: " + inputName);
}

// Place an input in the Multiviewer's Preview slot
// Use this to prepare (cue) an input before transitioning it to PGM
function SetPreview(inputName) {
    switcher.BackgroundInputName = inputName;
    Logger.Info("Preview set to input: " + inputName);
}

// Perform a hard cut transition between Preview ⇔ PGM
// The Preview input replaces the current PGM instantly
function Cut() {
    Project.ExecuteInputCommand(switcher, "CutCommand");
    Logger.Info(`Cut ${switcher.BackgroundInputName} to ${switcher.ForegroundInputName}`);
}

// Perform a crossfade (dissolve) transition between Preview ⇔ PGM
// duration = fade length in milliseconds (default: 1000ms)
function Crossfade(duration /* milliseconds */) {

    if (duration == undefined)
        duration = 1000;

    switcher.CrossfadeTransitionDuration = duration;

    Project.ExecuteInputCommand(switcher, "CrossfadeCommand");
    Logger.Info(`Crossfading ${switcher.BackgroundInputName} to ${switcher.ForegroundInputName} with ${duration}ms duration.`);
}
The JavaScript functions above serve as a starting point or boilerplate for programmatically controlling the Multiviewer. These examples are meant to help you get up and running quickly and can be extended or customized to build your own workflows using the Script Engine.
JavaScript functions can be triggered in three ways within Composer:
From direct API Calls – functions can be invoked directly through the Composer API. Examples:
// Execute SetPGM() to place the selected input in the Multiviewer’s PGM slot http://[YOUR_IP]:[PORT]/api/scriptengine/execute?function=SetPGM¶meter=[NAME_OF_INPUT] // Execute SetPreview() to place the selected input in the Multiviewer’s Preview slot http://[YOUR_IP]:[PORT]/api/scriptengine/execute?function=SetPreview¶meter=[NAME_OF_INPUT] // Execute Cut() to perform a hard cut between Preview ⇔ PGM http://[YOUR_IP]:[PORT]/api/scriptengine/execute?function=Cut // Execute Crossfade() to perform a crossfade between Preview ⇔ PGM with 800ms duration http://[YOUR_IP]:[PORT]/api/scriptengine/execute?function=Crossfade¶meter=800From other JavaScript functions – e.g. as part of a larger scripted workflow. See Script Engine.
From Connectors – allowing remote or automated triggers from external systems. See Connectors.
These options give you flexibility to automate and control the Multiviewer according to your workflow needs.
Manual Control
Using the Composer UI, you can manually operate the Multiviewer by editing and updating the options in the Switcher Input component. This allows you to monitor multiple inputs, manage overlays, and trigger transitions in real time directly from the interface.
For detailed descriptions of each option and how they affect the Switcher Input and Multiviewer, see the Switcher Input and Multiviewer reference page.