The Audio Recorder Operator is a versatile tool that allows you to capture audio from an input source and save the recording as a WAV file on your computer. The Audio Recorder Operator provides the flexibility to control recording duration, activate recording based on volume thresholds, and manage where your recordings are saved.
The operator is available in R1 2025 and later releases.
Getting Started
In order to be able to record audio, you first need to add an Audio Recorder Operator to an input source. Under Scenes, right click on your input's Operators icon  and select:
- Add Operator -> Audio Processing -> Audio Recorder
Now an Audio Recorder Operator has been added to your input and is ready for use.
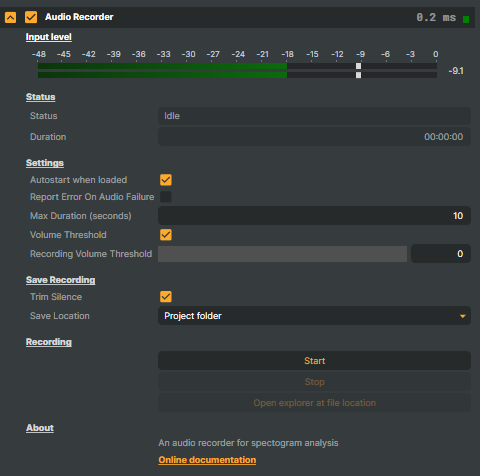
Input level
The Input level show the current audio peak level. If the peak level exceeds 0 dBFS, the signal overload warning indicator will be visible for two seconds.
Input level - Show the current audio peak level. If the peak level exceeds 0 dBFS, the signal overload warning indicator will be visible for two seconds.
Use Settings to adjust how long the signal overload indicator stays active, and Project Options to change the peak level threshold to your preference.
A miniature audio meter (VU meter) in the header indicates incoming audio, so you can quickly verify that the operator is receiving audio even when it is collapsed.
Use Settings to adjust how long the signal overload indicator stays active, and Project Options to change the maximum peak level displayed in all audio meters to your preference.
Status
This section displays real-time information about the Audio Recorder's operation:

- Status: Shows the current state of the Operator (e.g., Idle, Recording).
- Duration: Displays the total time the Operator has been recording in the format hh:mm:ss (e.g., 00:05:30 for 5 minutes and 30 seconds).
Settings
Customize how and when the Audio Recorder Operator captures audio.

- Autostart When Loaded:
Enable this option to automatically start recording when the project loads. - Report Error On Audio Failure:
Enable this option to log audio failures for easier troubleshooting. - Max Duration:
Set a time limit (in seconds) for the recording. For example, enter 120 to limit the recording at 2 minutes. - Volume Threshold:
Activate this option to begin recording automatically when the input volume exceeds a specified volume level. - Threshold Value:
Adjust the volume threshold using the slider or input box (range: 0–100). A higher value requires louder input to start recording.
Save Recording
Control where your audio recordings are saved.

- Trim Silence:
Remove silence from the start and end of the recording. - Save Location:
Choose where to save the recorded WAV file:- Project Folder (default): Saves the WAV in the same location as the current project file (*.prj). The file will have the same name as the project.
- Recordings Folder:
Saves the WAV in the "Recordings" folder within Composer application directory. The file will have the same name as the project.
Start Recording
Control your audio recording process with these buttons:

- Start:
Start recording audio from the input source. - Stop:
Stop recording. The audio will automatically save to the specified location. - Open Explorer at file location:
Opens the folder where the recorded file is saved for quick access.
Debug Options & Spectrogram Image Generation
The debug options provides additional settings to generate spectrogram images for your audio recordings. These settings become available if you enable the Debug Properties option in the application Settings.
Enabling Advanced Options
To get access to the Spectrogram options, follow these steps:
- Go to Edit in the menu bar.
- Select Settings.
- In the Debug tab, enable Show Debug Properties.
- Once this setting is activated, the Spectrogram options will appear.
Autotest
This section contains settings to control how spectrograms are generated and saved for testing purposes.

- Save Spectrogram For Test
- Enable this option to enable the Spectrogram setting and generate spectrograms. The spectrogram image will be saved based on the selected naming convention.
- Save Spectrogram As
- Choose the naming convention for your spectrogram file. This option will add a suffix to the generated spectrogram image filename. The available options are:
- Spectrogram: Appends "Spectrogram" to the filename.
- Spectrogram-result: Appends "Spectrogram-result" to the filename.
- Spectrogram-reference: Appends "Spectrogram-reference" to the filename.
- Choose the naming convention for your spectrogram file. This option will add a suffix to the generated spectrogram image filename. The available options are:
Spectrogram
These settings allow you to fine-tune the appearance and characteristics of the generated spectrogram image.
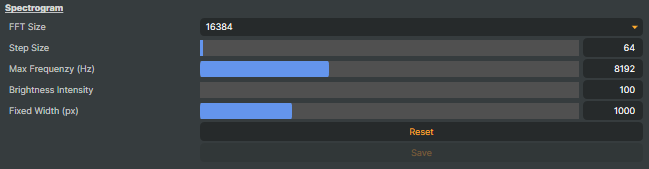
- FFT Size:
Select the size of the FFT (Fast Fourier Transform) used for the spectrogram generation. The available sizes range from 256 to 16384, with larger sizes providing more detail but requiring more processing power. - Step Size:
Adjust the step size for the spectrogram. This setting controls how often the audio data is analyzed to generate each frame of the spectrogram. The range is from 1 to 8192, with smaller values providing finer temporal resolution but requiring more resources. - Max Frequency (Hz):
Set the maximum frequency (in Hz) to display in the spectrogram. The range is from 0 to 24,000 Hz. This option allows you to focus on specific frequency ranges by limiting the displayed data. - Brightness Intensity:
Adjust the brightness intensity of the spectrogram image. The higher the value, the brighter the image, which can enhance visibility of the details in the spectrogram. - Fixed Width (px):
Set a fixed width (in pixels) for the generated spectrogram image. This ensures that the spectrogram always has the same width, regardless of other settings or the input audio data. - Reset:
Reset Spectrogram options back to default. - Save:
Generate and save Spectrogram to selected folder output.
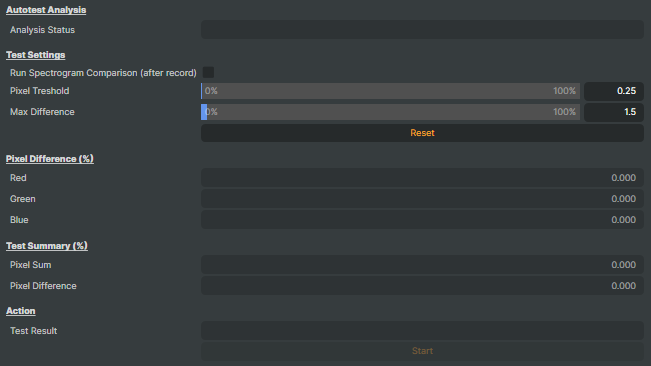
Autotest Analysis
The Autotest Analysis is mainly for internal use that allows for comparing spectrogram against a reference image to evaluate their similarity. This comparison is useful for testing audio recordings and ensuring that the spectrograms meet the expected results. By comparing the Spectrogram-reference image with the Spectrogram-result image, accuracy and consistency of audio recordings can quickly be assessed.
Create a Spectrogram-reference Image
To use the Autotest Analysis feature, a Spectrogram-reference image is needed:
- Configure the Audio Operator:
Adjust the settings of the Audio Recorder Operator to your liking. - Set "Save Spectrogram As":
In the Autotest settings, make sure that the "Save Spectrogram As" option is set to Spectrogram-reference.

- Record the Audio:
Start the recording. Once the recording is complete, the spectrogram image will be saved with the audio file, labeled as Spectrogram-reference.
This Spectrogram-reference image will serve as the baseline for future comparisons.
Run a test with Spectrogram Analysis
To run the Spectrogram Analysis for a new recording and compare it with a previously created reference image, follow these steps:
- Configure the Audio Operator:
Set the Audio Operator to the same configuration you used when generating the Spectrogram-reference image. - Set Save Spectrogram As:
Change the "Save Spectrogram As" option to Spectrogram-result. This will save the new spectrogram as Spectrogram-result and will be used for comparing with Spectrogram-reference .

- Start the Recording:
Record the new audio. The operator will generate the spectrogram for this recording and save it with the Spectrogram-result label.
Run Spectrogram Analysis
- Pixel Threshold:
Sets how much a pixel can differ before it's counted as "different" (in %). - Max Difference:
Sets the highest percentage of different pixels allowed for the images to still match. - Start Analysis:
When the recording is complete, click the Start button in the Spectrogram Analysis section to run the comparison between the Spectrogram-reference and Spectrogram-result images. - View the Analysis (in %):
The operator will compare the two spectrograms and present the analysis results when the comparison is complete. The analysis will show how similar the two spectrograms are, allowing you to evaluate the quality and consistency of your recordings:- Pixel Difference for Red, Green and Blue channels
- Pixel Summary
- Total Pixel Difference
- Test Result
For more information on audio, see Working with audio in scenes.