The Point Tracker has two functions. They can be used separately or both at the same time.
Automatic Position Adjustment
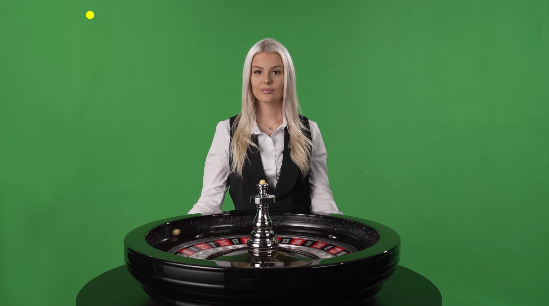
Composer can automatically adjust the position of a scene layer. This is useful if the camera has shifted slightly from the original setup.To enable position adjustment, there must be a small area or dot in the background with a specific color that Composer can track if it moves. This area or dot should be placed somewhere people won’t walk through.
Below is an example where a yellow dot in the background is used to track the position.
Automatic Luminance Adjustment
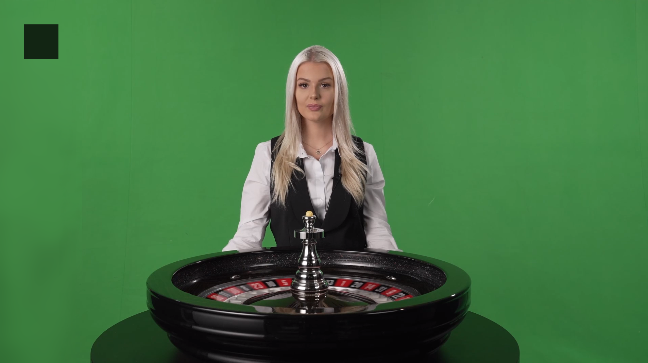
Composer can automatically adjust the luminance of a scene layer. This is useful if the lighting conditions have changed compared to the original setup.For automatic luminance adjustment, a specific area needs to be defined so that Composer can track any changes compared to the stored luminance. This area should be placed somewhere people won’t walk through.
Below is an example where an area in the background has been defined for Composer to track luminance differences.
![]()
Initial color and position:
Pick initial color and position - Button for activate the “picker”. Select a point in the Scene preview area.
Selected color - Selected color used for point tracking.Select between the color space RGB, HSV or HSL. Use the sliders or input fields to adjust the values to your desired color, or use the color picker to select a color from the Scene view window.
Scan area center X - The center tracking position X
Scen area center Y - The center tracking position Y
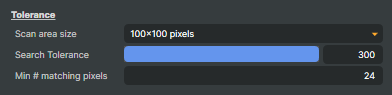
Tolerance:
Scan area size - (Dropdown) Select the size of the scanning area. The scan area uses the Scan area center X and Scan area center Y as reference for the calculating the tracking area.
Scan Tolerance - Tolerance when scanning pixels matching selected color.
Min # matching pixels - The minimum number of pixels within the scanning area that must match the selected color.
Output:
Tracker output - Options for detected tracker point
Input - Default when running the tracker
Detected pixels - Show detected pixels within the tracking area.
Tracker area - Show the tracking area.
Center point - Show the center point of the detected point.
Point detection:
# matching pixels - Numbers of pixels found within the tracking area matching the selected color.
Point found - (Read only), Selected color found within the tracking area.
Center X - Position X of the center of the tracked point.
Center Y - Position Y of the center of the tracked point.
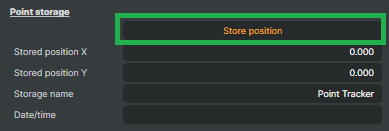
Point storage:
Store position - Button for storing position of point detected (Center X and Center Y)
Stored position X - The stored position X.
Stored position Y - The stored position Y.
Storage name - Name of the saved point tracker.
Date/time - Date and time when the point position was stored.
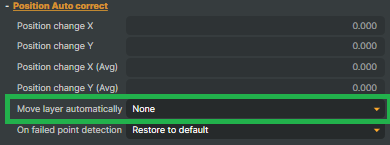
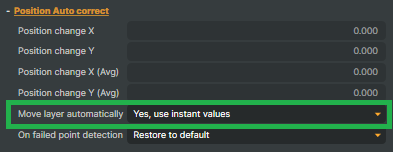
Position Auto correct:
Position change X - Number of pixels the X position has been corrected by.
Position change Y - Number of pixels the Y position has been corrected by.
Position change X (avg) - Number of pixels the X position has been corrected by when used average adjustment.
Position change Y (avg) - Number of pixels the Y position has been corrected by when used average adjustment.
Move layer automatically - (dropdown)
None - (Use None when adjusting the Luminance sensor)
Yes, use instant values - Adjust position X,Y instant.
Yes, use average values (10 frames) - Adjust position X,Y average over 10 frames.
On failed point detection - (dropdown)
Restore to default - If the tracker can not find a point with the selected color, do not use autocorrection of position.
Keep last correction - If the tracker can not find a point with the selected color, use last correction as autocorrection of position.
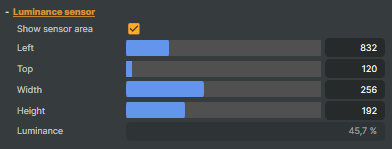
Luminance storage:
Show sensor area - Show sensor area. To be able to show the luminance sensor area, the Move layer automatically must be set to None during configuration.
Left - Start position X of luminance sensor area.
Top - Start position Y of luminance sensor area.
Width - The width of the sensor area.
Height - The height of the sensor area.
Luminance - Avarage luminance value (%)
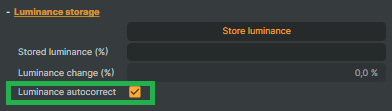
Luminance storage:
Store luminance - Button for storing luminance of selected sensor area.
Stored luminance (%) - Stored luminance value.
Luminance change (%) - Changed luminance (100% is equal to no luminance change)
Luminance autocorrect - Activate/deactivate the automatic luminance adjustment.
Warning and Errors:
Error on point lost - Generate a log Error.
2025:04:09 16:02:49 ERROR Point Tracker: point marker lost. Unable to determine position. Please recalibrate.Error on position changed - Generate a log warning
2025:04:09 15:58:04 WARNING Point Tracker: position error: the measured position differs from the stored reference position: 9,5, 0 pixels. Please recalibrate.Error on luminance changed - Generate a log warning
2025:04:09 15:54:02 WARNING Point Tracker: luminance error: the measured luminance differs from the stored reference: 91,6 %%. Please recalibrate.Position error threshold (pixels) - Threshold in pixels before a warning is logged for point offset.
Luminance error threshold (%) - The percentage offset at which a warning is triggered.
How to configure the Automatic Position Adjustment
![]()
Make sure there is a “point” to track in the background. (Like the small yellow dot in the example above)
First, set 'Move Layer Automatically' to 'None'.
Select the color/position of the tracking point by pressing the 'Pick Initial Color and Position' button, then click to define the tracking point in the Scene View window.
.png)
Define the tracker area size, tolerance and number of matching pixels.
Store the position
Activate autoadjust position.
How to configure the Automatic Luminance Adjustment
First, set 'Move Layer Automatically' to 'None'.
Enable 'Show Sensor Area'. Adjust the Left, Top, Width, and Height values to define the sensor area for luminance tracking. Make sure to select an area with consistent, even lighting.
Store the luminans values
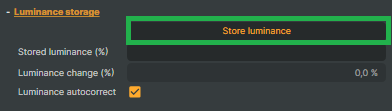
Activate the 'Luminance autocorrect'
Activate Auto-Adjust Position. (This must be enabled for Luminance Auto-Correct to work.)