Overview
The Audio Channel Strip Input is a special type of input that functions as an auxiliary bus, allowing you to send and route audio from other inputs into a dedicated channel. Rather than carrying its own media source, it serves as a flexible mixing point where multiple input signals can be combined, processed, and redistributed.
This makes it especially useful for creating sub-mixes (for example, grouping all microphones into one mix), building alternate outputs (such as a monitor feed or a recording track), or applying independent gain, panning, and routing without affecting the main program mix.
Although you can view and control an Audio Channel Strip through the Audio Mixer, it exists as an input in its own right. This means it integrates seamlessly into your project’s signal flow, giving you precise control over how audio is monitored, balanced, and delivered to different destinations.

Adding an Audio Channel Strip

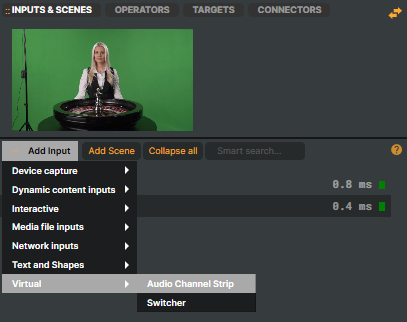
To add an Audio Channel Strip to your project:
- Click Add Input from the
INPUTS & SCENEStab - Expand the Virtual group
- Select Audio Channel Strip
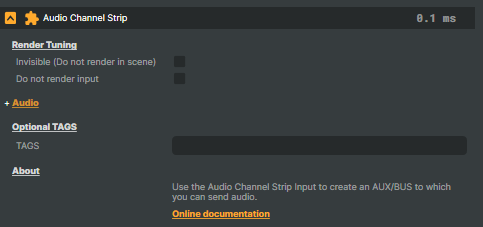
Render Options

These options, together with Render Tuning (see Performance and Options), help optimize performance by letting Composer automatically decide whether the input should be rendered.
When your project’s Render Tuning is active, Composer manages each input’s rendering automatically for best performance.
These options allow you to override that behavior and manually decide if this input should be rendered or excluded from the scene.
- Render Tuning works at the project level, automatically managing which inputs are rendered across all Scenes for optimal performance.
- Render Options work at the input level, letting you manually override or fine-tune how a specific input behaves within Composer’s automatic rendering process.
- Invisible (do not render in scene)
- The input will not produce any visible output in the scene, regardless of whether Render Tuning is enabled at the project level.
- Do not render input
- Let Composer decide (default) – Composer automatically decides whether the input should be rendered, based on the active Scene and Render Tuning.
- Manual configuration – Allows you to manually control rendering behavior using the Render switch (see below).
- Render
- A toggle switch available only when Manual configuration is selected.
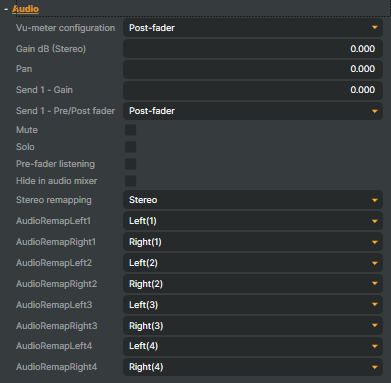
Audio options
Like other inputs that handle sound, the Audio Channel Strip includes its own set of Audio options. These options let you configure how the strip behaves in the overall mix — for example, adjusting metering, applying gain and pan, controlling auxiliary sends, or managing mute/solo states. You can also route audio flexibly and perform stereo remapping to fit specific output requirements. For detailed information on these settings, see Audio options.

An Audio Channel Strip can also serve as a routing point by sending its output to another Audio Channel Strip. This makes it possible to build layered sub-mixes or complex audio paths, giving you fine-grained control over how signals are grouped and delivered.
Send Audio to the Audio Channel Strip
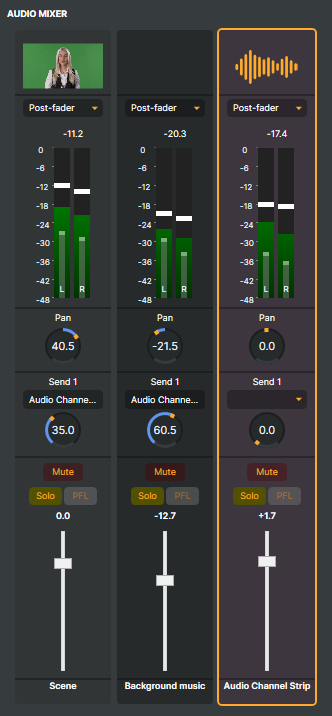
To route audio to an Audio Channel Strip, start by switching to the Audio Mixer view. This provides an overview of your audio in a traditional mixer-style layout, where you can select which inputs should send their audio to one or more auxiliary Audio Channel Strips.

- Enable the Audio Mixer view by clicking the
 button in the scene preview menu or selecting Layout -> Audio Mixer from the main menu.
 - From the input providing audio, open the Send 1 dropdown and select the name of the Audio Channel Strip** you want to send its audio to.
- Adjust how much audio is sent by increasing the Gain knob under Send 1. The VU-meters show the resulting level.
An Audio Channel Strip can receive audio from multiple inputs, which is useful for combining several audio sources into a single mix or sub-mix.
Audio Mixer
Whenever you add an Audio Channel Strip Input or any other audio-capable input, it is automatically available for editing in the Audio Mixer. The mixer provides an alternative way to adjust the same Audio options—such as gain, pan, mute/solo, auxiliary sends, and monitoring—closer to the layout of a traditional audio mixer. This allows you to balance multiple signals quickly and efficiently in real time.
While the mixer offers a convenient overview and controls, it’s important to remember that the Audio Channel Strip Input exists as an independent input in your project and is not limited to the mixer view.
For a full guide, see Audio Mixer.