Image Classification is an advanced AI feature that analyzes images and video frames to identify and categorize objects based on their visual characteristics. Instead of detecting and localizing objects within an image, this feature assigns labels to the entire image or specific frames in a video stream, helping users classify content with high accuracy.
This feature can be applied to a wide range of use cases, including but not limited to:
- Real-Time Decision Making: Instantly classify frames in live video streams to trigger actions or alerts.
- Content Organization: Automatically sort and categorize images based on their contents.
- Quality Control: Identify defects or anomalies in manufacturing and production processes.
- Automated Tagging: Enhance searchability by assigning relevant labels to images in large datasets.
These are just a few examples — you can use Image Classification in any scenario where automated image analysis and labeling provide value. Whether for automation, monitoring, or data analysis, this feature offers flexibility to suit your specific needs.
YOLO Models and Compatibility
Composer allows you to use YOLO models for Image Classification, giving you the flexibility to choose pre-trained models or train your own to fit your specific needs. By leveraging state-of-the-art deep learning models, you can fine-tune the classification process for optimal accuracy.
Requirements for models:
- Supported versions: YOLOv8, YOLOv9, YOLOv10, YOLOv11, YOLOv12
- Classification Models must be exported to ONNX format
- For details on exporting YOLO models to ONNX, refer to the YOLO documentation
For training custom models, please refer to the Ultralytics YOLO documentation.
ℹ️ Licensing for User-Supplied Models
- Commercial use of user-supplied YOLO models trained with Ultralytics tooling requires an Ultralytics Enterprise License.
- Composer does not provide or manage Ultralytics licenses.
For details, see Ultralytics Licensing.
System Requirements
The Image Classification feature requires CUDA Toolkit & cuDNN on both Windows and Linux.
Getting Started - Load a Model
To use Image Classification in Composer, the first step is to load your ONNX-model into Composer:
Click the "Load" button to open a file dialog. Browse to the location of your ONNX-model file and select it.
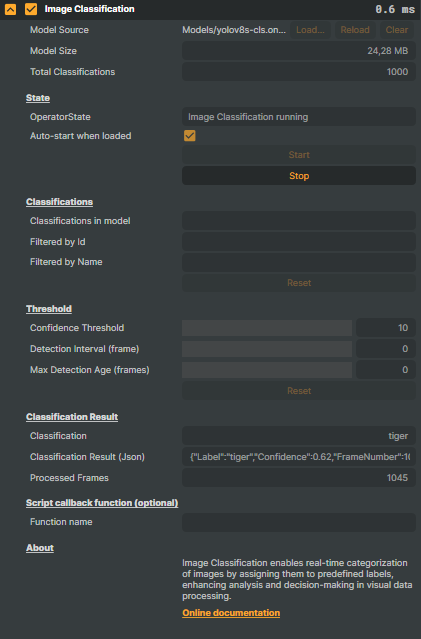
Once loaded, the model's information will be displayed. Ex:

- Model Source: Current loaded classification model
- Model Size: Size in MB.
- Total Classification: Number of classes the model is trained to detect.
Start and Stop Image Classification
To activate Image Classification, click Start to activate and Stop to inactivate.

Classifications
These options allows you to filter the classes the model detects so you can focus on specific frames of interest. If the model has been trained to detect many different categories but you are only interested in a few, these options can help you narrow down the classification results.

There are three options available in the Classes section:
- Classification In Model:
A dropdown that displays all the classes and their associated IDs the model is capable of classifying. This allows you to see exactly what the model was trained to recognize. - Filter Classes By Id:
Enter the class IDs of the objects you want to detect. These IDs should be entered as a comma-separated list. Only the classes corresponding to the specified IDs will be included in the detection results, all other objects will be excluded. - Filter By Class Name:
Similar to "Filter Classes By Id", this option allows you to filter detections by class names. Enter the names of the classes you’re interested in as a comma-separated list. You can also use wildcards (*) before and after class names for more flexible filtering. For example, if you want to detect all frames classified as "fire", you could enter *fire whose class labels end with "fire" or *fire* to filter all objects containing “fire” in its detected class label name.
These filtering options help you fine-tune the classification process by focusing on the classes that are most relevant to your use case, reducing the amount of irrelevant data and improving the classification efficiency.
Threshold
The Threshold section allows you to adjust various threshold values that control the behavior and accuracy of the image classification. These settings help fine-tune how the model performs and how often classifications are made.

- Confidence Threshold:
This value sets the minimum confidence level required for the model to consider an image/frame classified. The confidence threshold is specified as a percentage, ranging from 10% to 100%. A higher value means only classification with higher confidence will be considered valid. For example, a setting of 70% means only images/frames with a confidence score of 70% or higher will be classified. - Detection Interval:
This setting controls how frequently classification occurs. A value of 0 means classification is performed on every frame. If you set the detection interval to 5, detection will only occur on every 5th frame. This is useful for reducing computational load if you don’t need to perform image classification on every frame of the video. - Max Detection Age:
This setting determines how many frames a previous classification will be displayed in case of frame loss. For example, if the model loses track of a detected object, the detection will persist for the number of frames specified in this setting. This helps maintain detection continuity in case of brief occlusions.
These threshold settings allow you to adjust detection sensitivity, performance, and how long detected objects are displayed, providing greater control over the detection process.
Classification Results
The Classification Results displays real-time information about the current classification performed by the model. This provides insights into how the model interprets each frame and allows for further processing within Composer.
- Classification:
Displays the predicted class label assigned to the current frame by the model. - Classification Result (Json):
A JSON-formatted string containing the classification label, confidence score, and other relevant data. This output can be used for further processing within Composer’s Script Engine. - Processed Frames:
Total frames processed by the Image Classification model.

Script Callback Function
The Script Callback Function is an optional setting that allows you to define a custom function name to be triggered when an image classification event occurs. This feature is designed for advanced users who want to automate actions using Composer’s powerful Script Engine.

By specifying a function name, Composer will call the defined function whenever a classification result is generated. This enables you to:
- Trigger custom actions when specific classifications occur.
- Dynamically update scenes, UI elements, or other application components.
- Integrate with external systems or APIs based on classification results.
For example, you could write a script to display a notification when a certain class is detected, update on-screen elements based on classification changes, or log classification data for further analysis etc.
This feature provides flexibility for automating workflows and enhancing the functionality of Composer based on your specific needs. Read more about the Script Engine here.