The CAV Transcoder is a separate application that transcodes media files to the .cav format. The .cav format is useful for scrubbing seamlessly in the video using cue points. In Composer, it is possible to jump to a specific cue point by calling an API (Jump to Cue Point) or via a connector.
Desktop application
The application (ComposerCAVTranscoder.exe) is a Windows-only application and can be found in the CAVTranscoder folder of the Windows Desktop Composer application root folder. (C:\Program Files\RealSprint AB\Vindral Composer\CAVTranscoder)
The file extension .cav is an abbreviation of "Composer Audio Video" and is a proprietary file format
Important!
The CAV Transcoder needs to be launched with elevated user permissions (Administrator).
There are two modes in the CAV Transcoder, you can either transcode or play/edit a video file.
Transcode mode: .png)
For transcoding a video file to the .cav format, use File/Open File... and select a video file (.mp4 or .mov), and press the "Start transcode".
NOTE!
For .mov files, the only supported video codec is Quicktime Animation in colorspace RGBA (with alpha channel).
When the file is finished transcoding, it will automatically be saved in the same folder as the source with the same filename and with the extension .cav.
Play/edit mode:
.png)
The edit mode is used for adding cue points to the .cav video file. Inside Composer it is then possible to seamlessly jump between different cue points triggered by calling an API (Jump to Cue Point) or via a connector.
In the connector, set the index of the cue point using the "JumpToCuePointIndex" property, then activate the jump by setting the property "JumpToIndexCuePointCommand".
For editing a CAV file, use File/Open... and select the .cav file.
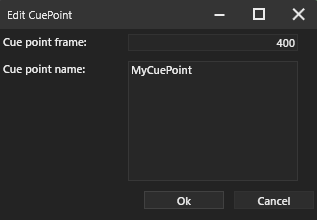
To add a cue point, play or step (using the buttons -1 and +1 or keyboard arrow left and right, ctrl + arrow will step 10 frames) to the frame where you want to add the cue point. Click the button "Add CuePoint" (or right-click in the timeline) and name your cue point, then confirm with "Ok".

Cue point frame - Frame of cue point in the video file
Cue point name - The name of the cue point.
To remove a cue point, right-click on the cue point in the timeline and select "Delete"
To adjust the frame of the cue point, right-click and select "Edit content" and change the Cue point frame in the dialogue box. It is also possible to click and drag a cue pint in the timeline.
Don´t forget!
Once you have added all your cue points, don´t forget to save the file.
Cue point behavior: Define what behavior the player should have when passing a cue point.
None - Continue playing as normal
ReplaySegment - Replay/loop segment (needs at least two cue points)
ReplayNextSegment - Replay/loop the next segment (needs at least three cue points)
PauseAfterNext - Pause at the cue point
Note!
This feature is for testing the behavior in the CAV Transcoder only and will not be saved in the CAV file.
The Cue point behavior feature is fully available in the Cav Movie/audio file input (as a property called "Action taken when passing a cue point") and can be controlled with the user interface or by triggering a connector.
Command line version
The command line version of the CAV Transcoder (cavconverter.exe) is a Windows-only application, found in the same folder as the desktop variant.
Launch the application from the command line or Powershell.
Launch parameters:
./cavconverter.exe --source [sourcefilename] --target [targetfilename]Use an absolute URI for the [sourcefilename] and [targetfilename].
Optional parameters:
quality (10-100): image quality setting. Default value is 80.
cuepointfile: a JSON file containing cue points that will be embedded into the target file.
Below is an sample jsonfile containing two cue points: one at frame 14 and "Kalle" as data value, and one at frame 24 and "Pelle" as data value.
{
  "14": {
    "VideoFrameIndex": 14,
    "Data": "Kalle"
  },
  "24": {
    "VideoFrameIndex": 24,
    "Data": "Pelle"
  }
}
Example usage:
./cavconverter.exe --source c:\temp\source.mp4 --target c:\temp\target.cav --cuepointfile c:\temp\source.json --quality 50