Color Correction/Color Curves
The Color Curves operator is commonly used as one of the first operators to apply to an incoming live feed. It's typically applied in two instances: one for camera calibration and a second instance for look and feel.
Camera calibration
Almost no camera is perfect, and almost all light setups and environments are far from color neutral. This means that the camera output will be slightly colorized in some way. Typical examples are that the output is too red, blue, or purple. It might be hard for the eye to detect such colorization because they adapt to the surroundings and automatically “white balance” the view. However, a camera does not have that capability.
Camera setup, white balance, light setup topics, etc., are out of scope for this guide, but we will go through how to use the Color Curves Operator for camera calibration.
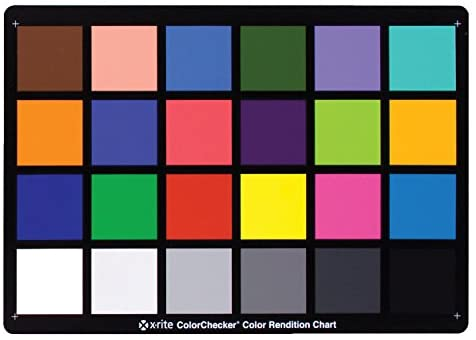
To calibrate the camera, you will need a Color Checker Board (aka Color Calibration Chart). The most important part of the Color Checker Board is the gray areas used to verify both luminance (gamma and exposure) and that the gray colors are neutral (not colorized). A typical Color Checker Board looks like this:
 To calibrate the camera, follow these steps:
- Make sure the camera's white balance matches the color temperature of the lights.
- Remove any gamma curve applied by the camera
- Remove any color profile added by the camera
- Position the Color Calibration Camera at a position in the studio where you want to make sure that the colors are correct. Typically, this is at the position where the presenter/guests are located because of the importance of skin colors being accurate.
- Make sure the chart is horizontal and verify that the chart is in focus.
- Add the Color Curves, Operator:
- Select the operator by clicking on the title
- Ensure that the crop area tool is active in the preview tool section.
You will find six yellow squares in the preview window. - Move the six square markers to the gray areas of the Color Calibration Chart. Make sure the markers are centered in the gray areas. The square marker with the highest value is placed on the white square, and the square marker with the lowest number is placed on the black square, the others in between.
- Press the Calibrate gray levels button.
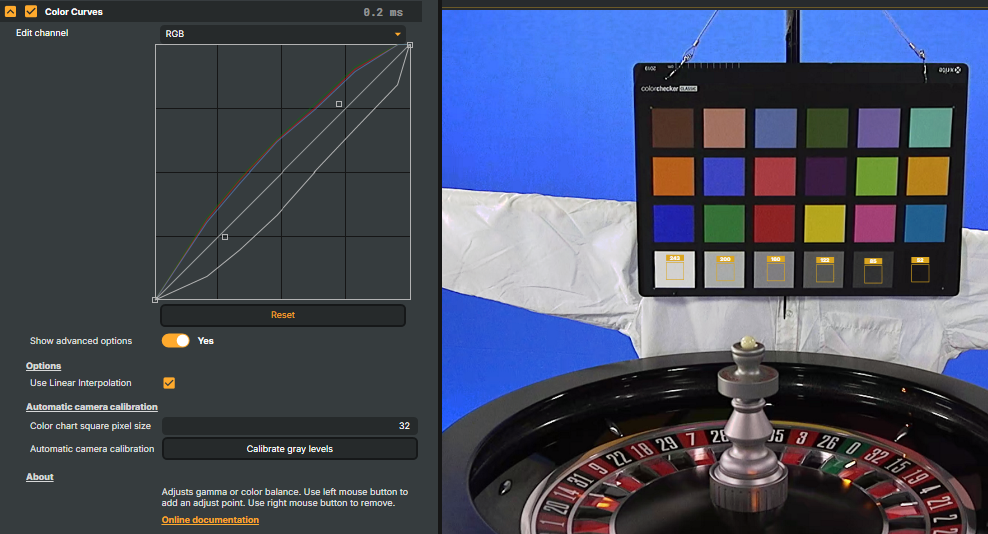 After the calibration is completed, the color curves are adjusted to make the gray colors neutral and correct the exposure.
Example:
Please note that even if the Color Calibration Chart has the correct exposure, other parts of the image might be overexposed or underexposed. If that's the case, you might consider reviewing the light setup.
Other options:
- Use Linear Interpolation - switches between linear and nonlinear interpolation between calibration points.
- Color chart square pixel size - size of calibration boxes
For reference, the expected white levels of the gray areas are as follows (0-255): 243, 200, 160, 122, 85, and 52.
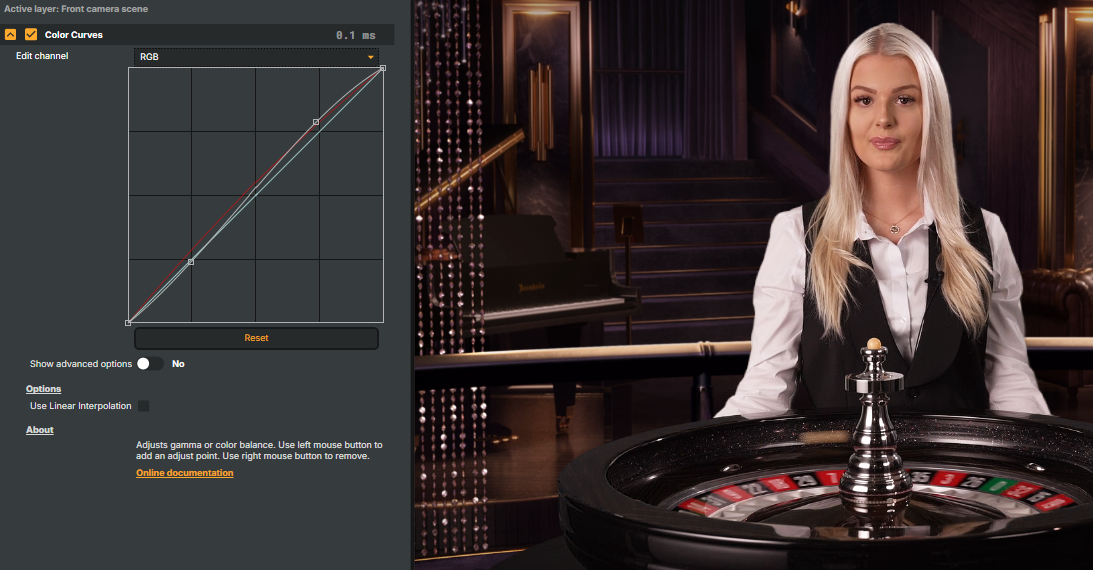
Using color curves for look and feel
The Color Curves operator can also adjust the look and feel of gamma, exposure, and colors.
Curves can be applied to the RGB channel (Red, Green, and Blue) and separated to each color channel.
To move a point on a curve, use the left mouse button and drag the point.
To add a point to a curve, left-click on the curve.
To remove a point from a curve, right-click on the point.
To reset a curve, press the Reset button.
To copy curves from one operator to another, right-click on the operator title
You can combine curves for RGB and each separate channel. Below is an example where we have increased the contrast by tweaking the RGB curve and added a bit of warmth by tweaking the Red channel: