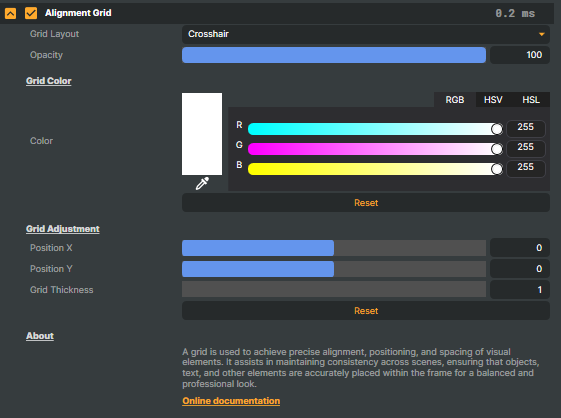
Misc/Alignment Grid
The Alignment Grid feature is designed to help you precisely place and align visual elements within your projects. This tool provides a flexible and customizable grid overlay that makes it easier to achieve perfect alignment and consistency across your projects.

-
Grid Layout:
The Grid Layout feature lets you choose from three different grid types to suit your specific needs:- Crosshair: Displays a simple crosshair at the center of the screen, ideal for quick centering of objects.
- 4x4 Grid: Divides the screen into 16 equal sections, offering more reference points for aligning elements.
- 8x8 Grid: Divides the screen into 64 equal sections, providing the most detailed alignment guide for precise placement.
-
Opacity:
The Opacity setting allows you to control the transparency of the grid overlay. This feature is useful when you need the grid to be visible without obstructing your view of the underlying video content. -
Grid Color:
To customize the grid color:- Select the color space to use, RGB, HSV or HSL.
- Use the sliders or input fields to adjust the values to your desired color, or use the color picker to select a color from the Scene view window.
- The grid will update in real-time to reflect your chosen color.
- Click the Reset button to reset the grid color back to its default white (R=255, G=255, B=255).
-
Grid Adjustment:
The Grid Adjustment feature lets you move the grid’s center position horizontally and vertically as well as setting the grid's thickness, giving you control over the exact placement of the grid on the screen. This is useful when your point of focus isn’t at the default center.- Position X: Move the grid horizontally
- Position Y: Move the grid vertically
- Grid Thickness: Set the thickness (in pixels) of the grid
- Reset: Reset the grid to its default center position.
-
Reset Options:
There are two reset options to quickly revert the grid settings back to their defaults:- Reset Color: Resets the Grid Color to white (R=255, G=255, B=255).
- Reset Offset: Resets the X and Y offset values to 0, centering the grid on the screen.
-
How to Use the Alignment Grid:
- Activate the Grid: Turn on the alignment grid from the settings menu.
- Choose a Layout: Select a grid layout that best fits your alignment needs.
- Customize: Adjust the grid’s opacity, color, and position as required.
- Align Objects: Use the grid as a reference to perfectly place and align your video elements.
Tips- Start with the Crosshair layout if you’re new to alignment grids. It’s simple and helps with basic centering.
- Use a higher opacity setting to clearly see the grid when aligning elements.
- Experiment with the 4x4 or 8x8 grids as you become more comfortable to achieve more precise alignment.
This feature is designed to enhance your editing workflow, ensuring that every element in your video is perfectly aligned and consistent. If you have any questions or need further assistance, please consult our help resources or reach out to support.
How to Set Up a Fixed Alignment Grid
If you need a permanent grid that remains fixed in place across your entire scene, follow these steps:
- Add a New Rectangle Input:
- Go to the "Add Input" dropdown menu and select "Rectangle".
- Rename the Rectangle:
- Rename the rectangle to "Fixed Grid" for easy identification in your layers.
- Move the "Fixed Grid" to Scenes:
- Drag the "Fixed Grid" from the inputs list to the bottom of the "Scenes" panel.
- Adjust the Rectangle's Size:
- Modify the width and height of the rectangle to cover your entire scene. This ensures the grid will span the full canvas.
- Set Alpha Level to 0:
- Set the Alpha (opacity) level to 0, making the rectangle 100% transparent.
This ensures the grid won't obstruct your view. - Lock the Grid:
- Lock the "Fixed Grid" by clicking the "Lock" icon next to the layer. This prevents accidental movement or changes.
- Attach the Alignment Grid:
- Attach a new operator of type "Alignment Grid" to the "Fixed Grid" layer.
This applies the alignment grid to the fixed rectangle, making it easy to align your elements while editing.
- Attach a new operator of type "Alignment Grid" to the "Fixed Grid" layer.
- Set the Alpha (opacity) level to 0, making the rectangle 100% transparent.
By following these steps, you'll have a fixed alignment grid that stays in place, helping you maintain consistent alignment across your scene without needing to adjust the grid each time.